| Scan Button Settings
|


|
|
| Clicking the Scan icon on the left pane in the Button Configuration window displays its current button settings on the right pane.
|
|
|
| The settings can be categorized into two: Application and File Saving Settings on the upper part, and Scan Parameters on the lower part.
|
|
|
| The items and parameters available in the window are explained as follows:
|
|
|

|
|
|
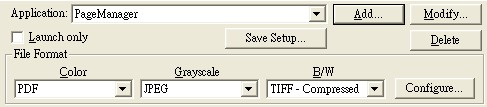
| Application and File Saving Settings
|
|
|
|
|
|
| Application
|
| Specifies an application program to be launched and linked to the Scan button. After the scan is complete, this application program is started up automatically and displays all scanned images.
|
|
|
|
|
|
| Up to 10 programs can be added to Application's drop-down menu.
|
| · | Clicking  opens the "Add/Modify Linked Application" window where you may add frequently-used programs to the Application menu. opens the "Add/Modify Linked Application" window where you may add frequently-used programs to the Application menu.
|
| · | Clicking  opens the "Add/Modify Linked Application" window where you modify the name, memo and command line for the current application. opens the "Add/Modify Linked Application" window where you modify the name, memo and command line for the current application.
|
| · | Clicking  to delete the current application link from the Application menu. to delete the current application link from the Application menu.
|
|
|
| After you select an application, the program icon will appear as the Scan button icon on the left pane of Button Configuration window.
|
|
|
|
|
| Launch only
|
| If this check box is ticked, clicking the Scan button will only start the linked application program. No scan is performed.
|
|
|
| This option allows you to set up this button as a hot key to simply launch an application program without scanning action.
|
|
|
|
|
| Save Setup...
|
| Clicking this button opens the Save Setup dialog box where you may determine where and in what file name format the scanned documents or images are saved.
|
|
|
|
|
| File Format
|
| Determines the image file format to save the scanned documents or images to. The following file formats are available from the drop-down list box:
|
| · | JPEG: Not available for B/W scan mode.
|
| · | TIFF - Uncompressed
|
| · | TIFF - Compressed
|
| · | PDF
|
| · | PNG
|
| · | Windows Bitmap
|
|
|
|
|
| Different file formats can be set for different scan modes. For example, if you usually need color images in JPEG and B/W images in BMP, you may configure so here. Next time when you scan a document in color first and then another document in B/W, you may simply change the scan parameters without the trouble of changing file formats frequently.
|
|
|
Clicking  opens the File Format Configuration window where you may configure advanced settings for JPG, TIFF - Compressed and PDF file formats. opens the File Format Configuration window where you may configure advanced settings for JPG, TIFF - Compressed and PDF file formats.
|
|
|
|
|
|
|
| Scan Parameters
|
| · | Scan Type
|
| · | Split
|
| · | Page Size
|
| · | Scan Mode
|
| · | Document Type
|
| · | Resolution
|
| · | Brightness
|
| · | Contrast
|
| · | Gamma
|
| · | Threshold
|
| · | Color Dropout
|
| · | Descreen
|
| · | Filter
|
| · | Page Settings
|
| · | Continuous Scan
|
| · | Apply Color Matching
|
| · | Auto Density
|
| · | Auto Crop
|
| · | Multi-Crop (This function may or may not be available depending on the scanner model you purchase.)
|
| · | Auto Deskew
|
| · | Image Edge Fill
|
| · | Multi-image output (This function may or may not be available depending on the scanner model you purchase.)
|
| · | Remove Punch Holes (This function may or may not be available depending on the scanner model you purchase.)
|
| · | Remove Background
|
| · | Denoise
|
| · | Character Enhancement
|
| · | Global Settings
|
| · | Preview
|
| · | Default
|
|
|
| Also see:
|
 How do I configure the Scan button? How do I configure the Scan button?
|
|
|
|
|
|
|
 Make sure you select an application that can process the specified file format. Scanned images cannot be displayed properly if the specified file format is not supported by that application.